Working with Projects
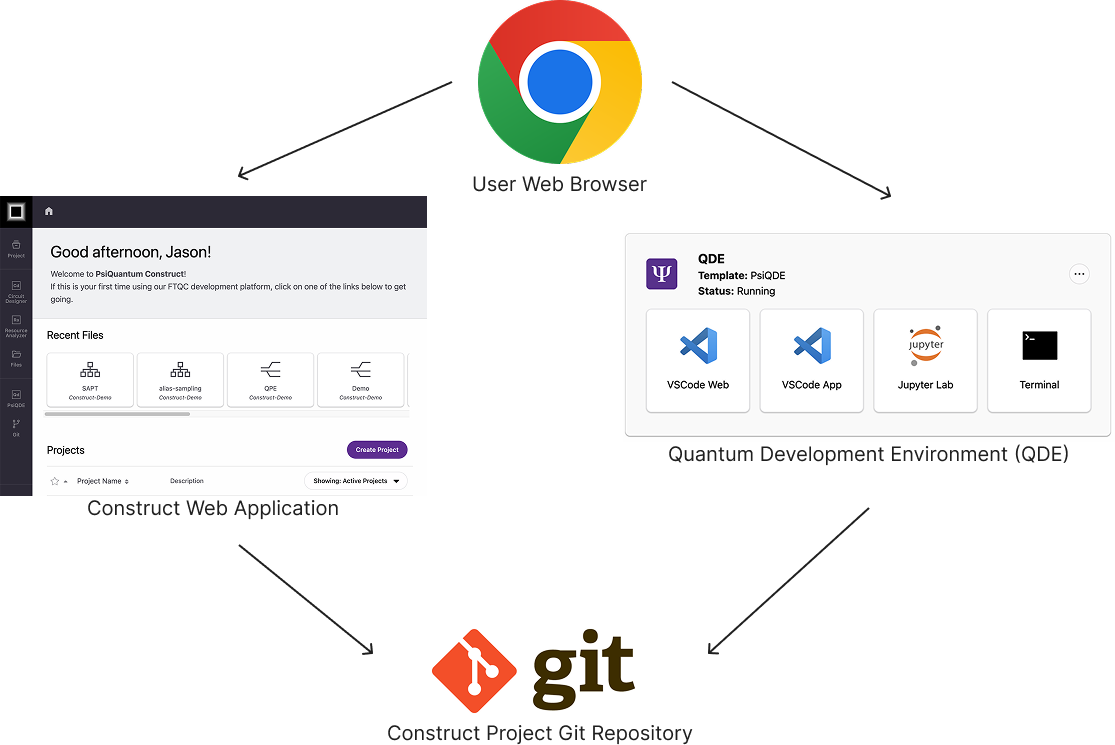
The QDE provides seamless integration with your Construct projects and Git repositories, enabling efficient development workflows with automatic authentication and project synchronization. Work with your existing Construct projects or integrate external repositories without complex setup.
Project Access in the QDE
Your QDE workspace automatically provides access to Construct projects through the /home/coder/projects directory. When creating a workspace, you can choose to clone your starred projects automatically, or add repositories later as needed.
Automatic Project Cloning
During QDE workspace creation, enable "Clone favorite projects" to automatically clone all repositories you've starred in Construct. These projects appear immediately in your workspace file system, ready for development work.
Cloned projects maintain their Git configuration and authentication, allowing you to commit and push changes directly from the QDE without additional setup.
Project Structure
All projects are organized in the /home/coder/projects directory:
/home/coder/projects/
├── my-quantum-algorithm/
├── circuit-optimization/
└── resource-estimation-study/
Both VS Code Web and Jupyter Lab automatically open in the projects directory, providing immediate access to all your repositories.
Git Workflows
The QDE includes pre-configured Git authentication with Construct's Git server (where all Construct projects files are stored), enabling standard Git operations without manual credential setup.
Basic Git Operations
Use standard Git commands directly in the terminal or through VS Code's integrated Git interface:
# Check repository status
git status

# Create and switch to a new branch
git checkout -b feature/new-algorithm

# Stage and commit changes
git add .
git commit -m "Implemented quantum fourier transform"

# Push changes to remote
git push origin feature/new-algorithm
Git Integration
The QDE provides seamless Git integration for version control and collaboration. VS Code Web includes visual Git integration through the Source Control panel, showing file changes, staging areas, and commit history. Use this interface for visual Git operations or stick with command-line tools based on your preference.
Collaboration Workflows
Changes committed and pushed from the QDE are immediately available to team members through standard Git workflows. Pull latest changes from colleagues using git pull or VS Code's pull interface.
Syncing Changes Back to Construct Projects
The QDE provides seamless synchronization between your development work and Construct project storage. Understanding this workflow ensures your code changes are properly integrated with other Construct tools and accessible to your team.
How Synchronization Works
When you commit and push changes from the QDE, they are immediately synchronized back to your Construct project repositories. This integration enables:
- Immediate Availability: Changes appear in other Construct tools (Circuit Designer, Resource Analyzer) as soon as they're pushed
- Version History: All commits maintain full Git history accessible through Construct's project interface
- Team Collaboration: Other team members can see your changes in other Construct tools and their QDE workspaces (after pulling changes using git pull)
Basic Sync Workflow
The standard workflow for syncing work back to Construct:
cd my-project

# 1. Check current status
git status

# 2. Stage your changes
git add .

# 3. Commit with descriptive message
git commit -m "Implement quantum error correction circuit"

# 4. Push to Construct project repository
git push origin main
Your changes are now synchronized and available throughout the Construct platform.
Viewing Synced Changes in Construct
After pushing changes from the QDE, navigate to your project in the Construct web interface
- Changes appear in the project file browser immediately
- Other team members can pull your changes in their QDE workspaces
- Updated code can be referenced by Circuit Designer and Resource Analyzer
Sync Status Verification
Verify your changes are properly synchronized:
Automatic Authentication
The QDE handles Git authentication automatically for Construct projects. You don't need to configure credentials or tokens - the external authentication flow you completed during setup provides seamless Git access.
Working with External Repositories
The QDE can work with repositories beyond Construct projects, including GitHub, GitLab, and other Git hosting platforms.
Adding External Repositories
Clone external repositories directly into your projects directory:
External repositories appear alongside Construct projects in your workspace file system and development interfaces.
Authentication for External Repositories
Working with private external repositories requires additional authentication setup since the QDE's automatic authentication only applies to Construct projects. You can use either SSH keys or personal access tokens.
SSH Key Authentication (Recommended)
SSH keys provide secure, password-free authentication for Git operations. Set up SSH authentication once per workspace:
Step 1: Generate SSH Key Pair
# Generate a new SSH key pair
ssh-keygen -t ed25519 -C "your-email@example.com"

# When prompted for file location, press Enter for default location
# Optionally add a passphrase for additional security
Step 2: Display and Copy Public Key
# Display your public key
cat ~/.ssh/id_ed25519.pub

# Copy the entire output (starts with ssh-ed25519...)
Step 3: Add Public Key to Git Host
For GitHub:
- Go to GitHub Settings → SSH and GPG Keys
- Click "New SSH Key"
- Paste your public key and save
For GitLab:
- Go to GitLab Preferences → SSH Keys
- Paste your public key and click "Add key"
For Other Git Hosts: Follow their SSH key documentation
Step 4: Test SSH Connection
# Test GitHub connection
ssh -T git@github.com

# Test GitLab connection
ssh -T git@gitlab.com

# You should see a success message mentioning your username
Personal Access Token Authentication
For HTTPS cloning, use personal access tokens:
Step 1: Generate Token
For GitHub:
- Settings → Developer settings → Personal access tokens → Tokens (classic)
- Generate new token with
reposcope for private repositories
For GitLab:
- Preferences → Access Tokens
- Create token with
read_repositoryandwrite_repositoryscopes
Step 2: Clone with Token
# Clone using token (replace TOKEN and USERNAME)
git clone https://USERNAME:TOKEN@github.com/username/repository.git

# Or configure Git to store credentials
git config --global credential.helper store
git clone https://github.com/username/repository.git
# Enter USERNAME and TOKEN when prompted
Authentication Troubleshooting
SSH Connection Issues:
# Test SSH with verbose output
ssh -vT git@github.com

# Check SSH agent
ssh-add -l

# Add key to SSH agent if needed
ssh-add ~/.ssh/id_ed25519
HTTPS Authentication Issues:
# Clear stored credentials
git config --global --unset credential.helper

# Reset credentials for specific host
git credential-manager erase
Working with Existing GitHub Repositories
The QDE fully supports working with existing GitHub repositories, enabling you to bring your quantum computing projects into the QDE environment or contribute to open-source quantum projects.
Complete GitHub Workflow
Step 1: Set Up Authentication Follow the SSH key or personal access token setup above for your GitHub account.
Step 2: Clone Repository
cd /home/coder/projects

# Clone with SSH (recommended after SSH setup)
git clone git@github.com:username/quantum-project.git

# Or clone with HTTPS using token
git clone https://github.com/username/quantum-project.git
Step 3: Install Dependencies
cd quantum-project

# Create virtual environment using uv (recommended)
pip install uv
uv venv venv
source venv/bin/activate
uv pip install -r requirements.txt

# Or install in development mode if it's a package
uv pip install -e .

# Alternative: using standard venv
python -m venv venv
source venv/bin/activate
pip install -r requirements.txt
Step 4: Make Changes and Contribute
# Create feature branch for external project contributions
git checkout -b feature/qde-integration

# Make your quantum algorithm changes
# Edit files in VS Code Web or Jupyter Lab

# Commit and push changes
git add .
git commit -m "Add quantum circuit optimization for QDE"
git push origin feature/qde-integration

# Create pull request on GitHub for code review
Construct vs External Projects
Construct Projects: Work directly on main branch for immediate integration with Construct tools
External/Open Source Projects: Always use feature branches and pull requests to follow project contribution guidelines
GitHub Repository Types You Can Work With
- Personal Repositories: Your own quantum computing projects and research code
- Organization Repositories: Company or research group projects (requires appropriate access permissions)
- Open Source Projects: Contributing to public quantum computing libraries
- Forked Repositories: Fork existing projects to create your own version for experimentation
Best Practices for External GitHub Work
Separate Virtual Environments: Create project-specific environments to avoid conflicts:
# For each GitHub project (using uv - recommended)
cd /home/coder/projects/github-project
pip install uv
uv venv project-venv
source project-venv/bin/activate
uv pip install -r requirements.txt

# Or using standard venv
python -m venv project-venv
source project-venv/bin/activate
pip install -r requirements.txt
Keep Projects Organized: Use clear directory naming:
/home/coder/projects/
├── my-construct-projects/    # Construct projects
├── github-cirq-contrib/    # External GitHub projects
├── research-experiments/     # Personal research code
└── open-source-work/        # Open source contributions
Regular Synchronization: Keep your fork/clone synchronized with upstream changes:
# Add upstream remote (for forks)
git remote add upstream https://github.com/original-owner/repo.git

# Sync with upstream changes
git fetch upstream
git checkout main
git merge upstream/main
git push origin main
Project Management Best Practices
File Organization
Organize quantum algorithm projects with clear directory structures:
project-name/
├── algorithms/         # Core algorithm implementations
├── notebooks/          # Jupyter notebooks for analysis
├── tests/              # Test suites
├── docs/               # Project documentation
└── resources/          # Resource estimation files
Commit Practices
Make frequent, focused commits with descriptive messages:
git commit -m "Add quantum fourier transform implementation"
git commit -m "Optimize gate count in arithmetic circuit"
git commit -m "Update resource estimation parameters"
Integration with Construct Tools
QDE projects integrate seamlessly with other Construct platform tools.
Circuit Designer Integration
Quantum circuits designed in Circuit Designer can be imported into QDE projects. Save circuit files in your project repository for version control and collaborative development.
Resource Analyzer Integration
Resource estimation files generated in the QDE can be opened directly in Resource Analyzer for visualization and analysis. Changes made in either tool are reflected in the shared project files.
Project Synchronization
Changes made in the QDE are immediately available in other Construct tools when committed to Git. This enables seamless transitions between visual design tools and code-based development.
Working with Notebooks
Jupyter notebooks in the QDE projects support collaborative development and documentation workflows.
Notebook Organization
Store notebooks in dedicated directories within your projects:
project/
├── notebooks/
│   ├── 01-algorithm-exploration.ipynb
│   ├── 02-parameter-optimization.ipynb
│   └── 03-results-analysis.ipynb
└── algorithms/
    └── implementation.py
Version Control for Notebooks
Jupyter notebooks can be committed to Git, though large outputs may increase repository size. Consider clearing outputs before committing for cleaner version control:
# Clear outputs before committing
jupyter nbconvert --clear-output --inplace notebook.ipynb
git add notebook.ipynb
git commit -m "Add algorithm analysis notebook"
Sharing Notebooks
Committed notebooks are immediately available to team members and can be opened in any QDE workspace or local Jupyter installation.
Data Persistence
QDE workspaces maintain persistent storage for all project files between sessions.
Workspace Storage
All files in /home/coder persist between workspace sessions, including:
- Project repositories and Git history
- Installed Python packages
- Configuration files and settings
- Jupyter notebooks and outputs
Backup Strategy
While workspace storage is persistent, always commit important work to Git for long-term preservation. Workspace storage is intended for active development, not long-term archival.
Next Steps
- Software and Libraries - Installing additional packages and tools
- Workspace Management - Managing workspace resources and templates